PS Placeable 2K build guide
This page will walk you through all you need to know on how to assemble a PS Placeable.
PLEASE MAKE SURE YOU INSTALL THE FIRMWARE ON THE BT PCB BEFORE STARTING THIS GUIDE. Directions here
Be careful, any modifications to electronics can cause harm to you or your device. These kits have small parts keep them out of the reach of small children as they could be choking hazards.
Parts needed (Go install BT PCB firmware FIRST)
Ok before we begin lets assume you purchased from us, and that you have followed the disassembly guide leading you to this page next. All the parts you need for this build are: A PSP, 1 fourteen pin, 2 ten pin, and a custom PSP 2K FFC for the analog stick. The BT PCB V2, 3mm LED (any color you want we give blue ones) four M3x18 screws, eight 2x6mm magnets, top, middle, bottom printed shell, 4 special wide head screw for the PCB, the custom ribbon cable bracket, 3 shell buttons, 4 rubber feet. We use OEM PSP charging cables to power the PS Placeable. PLEASE USE THESE only. The PSP has a large number of after market chargers and they at best wont work with the build and at worst can harm the mod and your PSP! You will also need some cable for cutting and soldering in the next steps. We do not include loose conductors, feel free to use any that you like. Everything else is included in the kits you can. buy from us.

Lets start with soldering
(skip the next 6 steps if you bought a pre soldered kit.)
We will be cutting the PSP power cable and splicing it to the board. Its important you know which cable is positive and negative. You can use a multimeter or your cable may be labeled already like mine is. Its always best to check though.

(UPDATE 2/1/2025) New board revisions (Front)
New board designs are in the works to make assembly and soldering easier. The first revision going out is the new board has only 1 analog connector. The picture below will show the front changes and the next will show the back changes.
Blue - Analog is now one connector to prevent cable overlap issues. 2K builds will get a 4 pin custom ribbon cable and 3K builds the big change is this connector is ribbon fingers down. (more on that when we connect cables.
Red - This is where you will solder negative and positive for the gray PSP part. Its the power going into the PSP
Yellow - This is where the yellow barrel connector will get soldered to. The positive and negative power in.
These pads may move in a future revision but the labels will stay the same. So the guide applies even if your board looks different but has the same labels.

(UPDATE 2/1/2025) New board revisions (Back)
The back has a few changes to be on the look out for.
Yellow - These are the LED positive and negative solder points. There is no longer an LED on the board to remove as these all will be for consolizers. This also allows for a much shorter LED cable.
Red - This is for analog connection. If the 2K ribbon cable is giving you trouble you can solder from the 2K PSP board to these points for a permanent connection. The PSP can not be changed after that so please know this is a last resort.
These pads may move in a future revision but the labels will stay the same. So the guide applies even if your board looks different but has the same labels.
Cut the power cable in half
We need both ends of the power cable separated. So lets cut at the center. if yours is all black keep track of which side is positive and negative.

Solder wires to each end
Solder wires to all four ends we have cut and stripped. I use heat shrink to seal these joints when I am done. It may be easier to have individual conductor wires instead of keeping them together like i have below on the right.

Heat shrink and get the other ends ready
Once all four cables have been extended we can heat shrink them and tin the other sides getting them ready to solder to the board.

Both positive (red) wires are soldered to PWR
Take your two positive wires you will have one connecting to the yellow power in part and the tan power to PSP part. Take the positives from each of these and solder them to the PWR pad next to the micro USB port.

Both Negitive (brown) wires are soldered to GND
Take the other two wires and solder them to the GND pad below the ESP. Set these wires to the side.

(Optional) - Add an external LED
You can optionally remove the LED from the board and solder wires to an external LED. We will include the LED when you buy with us. use some wire and solder positive to the bottom pad and negative to the top pad.

Seating ribbon cables
When putting together a 2K we use a custom FFC. This cable will be taped in place first then pressure will be applied either by the thumbstick or the provided spacer.

Tape the custom ribbon cable down
(Update 4/4/25 - The custom ribbon cable has been updated to make install much easier. No cutting should be needed and if you have your original thumb stick you can leave it in place and use that to lock the ribbon cable in place.)
Remove the cover from the double sided tape. Place the cable down over the 4 pads. The white lines around the FFC pads should be facing up. The placement of this is very important. You should feel no resistance when pressing the tape down. If the top edge is rubbing any components or the video out connector carefully trim a bit of the top with scissors. DO NOT CUT ANY TRACES. If you have a thumb stick that is endlessly triggering when your build is done it means this cable was not seated right. I am working on more info for this step.
It is easy to ruin this pads or traces so be carful not to bend the ribbon cable at 90 degree angles slight bending is fine but a hard bend or crease will damage the traces.

Spacer to hold the ribbon in place
(Update 4/4/25 - you can use the thumb stick instead of the included spacer. The thumb stick will work way better then the spacer will with the new updated ribbon cable.)
The ribbon cable needs pressure to hold it in place. We accomplish this in two ways. A spacer and a peg inside the base of the Placeable shell. The spacer lines up with the exact spot the thumb stick would be. This lets users set aside the thumb stick and or helps users who no longer have a thumb stick.

Place the board back in the shell
Slide the PSP board into the shell. make sure you lift the disk drive power and read cables up. then press the board into place we will be screwing the board down using a small black screw we removed from the bottom corner.
Please keep in mind that no ribbon cables should be folded completely in half or creased, its easy for the traces to brake if you do that!

Two 10, and one 14 pin connector locations
From left to right the connectors are L or Left a 10 pin connector, C or center connector this is the second 10 pin connector The 14 pin cable goes to the R or right connector.

Place the bracket over the PCB before connecting the last ribbon cable.
(Update 1/21/25 - Most if not all orders at this point will ship with 4 custom screws that hold the PCB in place without the bracket.)
Slide the bracket down into place over the PCB. make sure to pull the ribbon cables through. You can always cut the bracket above the ESP to slide the cables in and out but I have found it best to leave the bracket as is.

Custom analog FFC
The last ribbon cable goes to the analog connector and can be a bit harder to get into place but the next picture shows how I have my cables all set up.
Update, If you have a V0.3-C or later board revision or you only see a 4 pin analog connector. That is used for the 2000 build as well with a new 4 pin custom ribbon cable.

Connect the analog ribbon
The two side cables are on top and the bottom cables are under the other two. Its at this step I tell people to connect ribbon cables and test out the buttons and analog stick. I have had to take quite a few apart that I didnt test before assembling. Jump down a few steps to see how the ribbon cables connect, then come back and get your shell ready for assembly! :)

Place the buttons in the base
(Update 1/25/25 - Most shells now only have X and O buttons Triangle has been removed.)
Take the three PlayStation shaped buttons and place them into the matching slots.

Popping out supports
Any part that has an overhang in printing needs supports. The 4 holes for our screws and the base buttons have support parts. It is possible yours have not been removed. Doing so is easy.
For the base buttons just push your buttons into place which will pop the supports out.
The 4 corners take one of your included black screws and push down through the top of the screw hole as shown below.
PSP braces
The shells have two support pegs as shown in this picture and the one below. These pegs are optional but require a bit of explaining. The peg shown below is a way to add support pressure for the custom 2000 ribbon cable. In all my builds I have removed this peg. Placing the TPU ribbon support part and then screwing the board back down should give you the needed support for the ribbon cable.
IF your PSP screw post is broken as so often the 2000 models do then this peg will help provide the pressure needed.

PSP braces continued
DO NOT brake the peg off until you have tested your build. I connect all my cables (follow the guide to learn to connect them) Once that is done I will run a test playing a game I know uses the analog stick. I use Steambot Chronicles as its load time is quick and the menu gives access to using the analog stick.
Come back to this step and remove the peg if the screw gives enough support for the analog stick to work.

PSP braces continued
The second brace is in the front right of the shell some will have this as a stand alone peg and some have this as a peg attached to the screw post in both situations you will NOT NEED this peg in place IF
Your PSP has the small white part that used to hold the right bumper in place. Screwed down holding the mother board in place
All 2000 models come with this white part holding the PSP bumpers in place. The teardown guide asks you to hold on to that part and it is needed to provide stability for the PSP. This peg serves the same function but I recommend keeping and using the white brace.

PSP braces continued
You can see the board move without the white support part, and you can see it move with out the peg on the base. This peg gives you options on how you would like to support your PSP. Just know one form of support is needed or you will see UMD read issues.
If your PSP read disks before the build and does not anymore. That is due to a lack of board support add that white part in or glue to peg back in place. I always test my builds before I remove any pegs.

Screw down power port
Once you have placed all three buttons you can screw in the power port first. You want to slide it into place or just push it straight down. The round part should sit flush with the back and then it can be screwed into place.

Tuck extra cable length and screw bracket into place
(Update 1/14/25 - Most orders now will ship with custom screws that eliminate the need for a PCB bracket.)
I tuck an extra cable under the PCB. Make sure that all buttons on the bottom can still be pressed and your cables are not in the way of those. I start with the circled screw, under it is a guiding peg to help you line the board up.
DONT OVER TIGHTEN THESE SCREWS - these are just the right length but they don't bottom out so just a few turns will be enough to keep them in place. Once you feel a little resistance they are set.

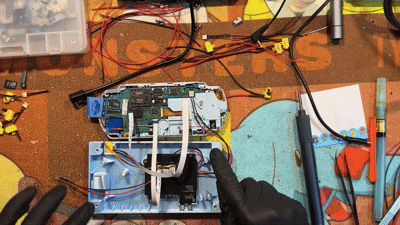
Start to connect the cables to the PSP
Slide your PSP right against the case and start to connect the cables. I am putting the power in last here but there is no real order for this. Remember the back of the BT PCB has all the ribbon name locations so you can read those if you forget which cable is which. Below is an image that shows the corresponding locations.

A guide to all the connector locations
(Update 2/18/25) - If your PS Placeable will not display video out after the first test. This is a known issue. Most likly due to the PSP having a slow warm boot time. version 2.3 of the BT mod board will let you configure the wait time for a warm start. To test this if you are on firmware 2.2 or later the button combo (Start+Select+R1+L1+left on dpad) hold that combo for 8 -10 seconds and the video out should switch once your placeable is fully booted. If it does then you just have to adjust the warm start time on the configuration page of the web app.
Each connector is colored and labeled in the picture. They do go left to right with the exception of the analog stick being on the far left and already connected to the 2K board. Take a look at the picture if you are lost or need to double check your cables.

(Optional) - Slide LED into the holder
The inside wall on the front of the shell has a small part that is made to hold the 3mm LED we included with the kit. If you choose to use this LED slide it into place and bend the legs around the center part while pressing the LED into the cone with tweezers. It should stay in place on its own.

Fold your PSP forward
The PSP should line up perfectly with the 4 pegs that match the location of the screw posts on the front screen. The ribbon cables should fold on themselves and then the PSP can be screwed in place using the 4 shell screws we kept from disassembling the PSP.
TIP - Its at this point I tend to put two of the four screws in (two corners) and I take it to my set up and test it. Its best to load a game up that you know uses all the PSP buttons, and the analog stick You can also remote into the webapp and test the connections. Click here to open a page with that part of the configuration guide.(not set up just yet)

Slide middle into place
The middle section of the case slides down and will align with the bottom perfectly. Once again the Power port should be flush on the back side, and there are a few guiding parts that will make sure both parts are aligned.

Flip over and place 4 screws into place.
Take the 4 included M3 x 20 screws and slide them into place. They should slide down a bit and then when you start turning them you will feel resistance.

The screws will bottom out
These screws will bottom out and have lots of support. Tighten until the ends of the screws are sitting flush with the other side of the middle of the case.

Slide magnets into place
(Update 1/14/25 - Some orders will have 4 thin magnets and 4 thick magnets stack these in sets of 2 with 1 thin and 1 thick.)
The kits will come with 8 magnets. These 2x6 dots will be placed in stacks of two into the holes at the 4 corners of the top part. Simply push the stack in so that 2 magnets are inside the hole. Doing that for all 4 holes.
You may have to apply some force to get them into place. Make sure you have the top resting on a flat surface so you don't brake the thin face if using a full cover top. The magnets will stay in all by themselves.

Enjoy the top snapping closed.
The 4 corners line up with the flush screws holding the middle to the base of the shell. This lets you cover the AV cable out in the back while sealing the whole case closed.

Flip one last time to place the feet on
All kits come with 4 rubber feet that can be placed over the screw holes to cover them up like any good Sony console!
The memory card
All shell kits come with the memory card holder. This part lets you insert and remove the memory card with ease. Line up the side with the matching logo or the side with label words if using an aftermarket SD card or adapter.

Match the textures
I print these so that the top of the shell and the top of the memory card holder are the same texture that way you know which side should be facing up. They should match.

Push it to click into place
This uses the push and lock feature of the PSP letting the holder sit flush with the edge while its in the closed and reading position, but when you would like to remove it you can just press on the holder and it will slide out for you to grab.

You are all done!!!
Alright great job! you got it all together and ready to go. Hopefully you ran a test a few steps ago when I suggested to do so. If not then go plug it in and connect a controller. If everything works as intended then you are ready to configure custom button mappings and see what the web app has to offer for using all the features of the BT mod. The link below will take you to the configuration guide the last one!
